Clean • Professional
border-image)The border-image property in CSS lets you use an image instead of a solid color for borders. The image is sliced into sections and then stretched, repeated, or rounded to fit the edges of the element, creating decorative and stylish frames.
border-image WorksThe border-image property slices the image into nine parts, similar to a tic-tac-toe board:
border-image Shorthand PropertiesThe shorthand border-image property combines multiple border image properties:
| Property | Description |
|---|---|
border-image-source | Specifies the image to use as the border. |
border-image-slice | Defines how to slice the image into corners and edges. |
border-image-width | Sets the width of the border image. |
border-image-outset | Determines how far the border image extends beyond the element. |
border-image-repeat | Controls how the edges and center are filled: stretch, repeat, or round. |
Syntax Example:
element {
  border: 10px solid transparent; /* Required */
  border-image: url('border.png') 30 round;
}
Border Image with round
round in border-image repeats the border evenly and resizes parts slightly to keep it smooth and neat.
<div id="borderimg1">Border Image Rounded</div>
#borderimg1 {
  border: 10px solid transparent; /* Required for border-image */
  padding: 20px;
  border-image: url('border.png') 30 round; /* Repeat the edges */
  width: 250px;
  text-align: center;
  font-weight: bold;
}
Output :

Border Image with stretch
stretch makes the border image fill the sides by stretching it instead of repeating.
<div id="borderimg2">Border Image Stretched</div>
#borderimg2 {
  border: 10px solid transparent;
  padding: 20px;
  border-image: url('border.png') 30 stretch; /* Stretch the edges */
  width: 250px;
  text-align: center;
  font-weight: bold;
}
Output :

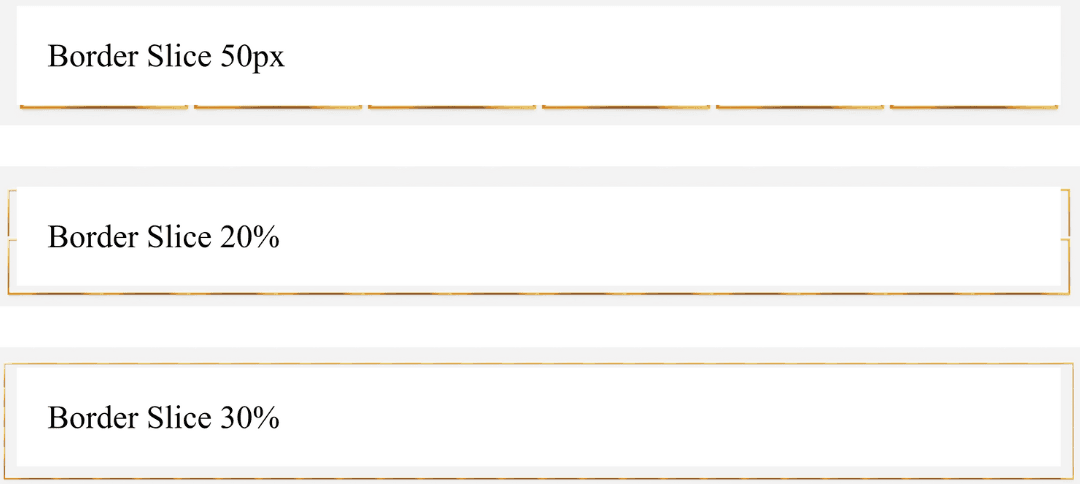
Different Slice Values
You can control how much of the image is used for borders by changing the slice value:
<div id="borderimg3">Border Slice 50px</div>
<div id="borderimg4">Border Slice 20%</div>
<div id="borderimg5">Border Slice 30%</div>
#borderimg3 {
  border: 10px solid transparent;
  padding: 15px;
  border-image: url('border.png') 50 round;
  margin-bottom: 20px;
}

#borderimg4 {
  border: 10px solid transparent;
  padding: 15px;
  border-image: url('border.png') 20% round;
  margin-bottom: 20px;
}

#borderimg5 {
  border: 10px solid transparent;
  padding: 15px;
  border-image: url('border.png') 30% round;
}
Output :

<!DOCTYPE html>
<html lang="en">
<head>
<meta charset="UTF-8">
<meta name="viewport" content="width=device-width, initial-scale=1.0">
<meta name="description" content="Learn CSS border-image property with examples. Use images as decorative borders around elements with round, stretch, and custom slice values.">
<title>CSS Border Image Example</title>
<style>
  #borderimg1, #borderimg2, #borderimg3, #borderimg4, #borderimg5 {
    width: 250px;
    padding: 20px;
    text-align: center;
    font-weight: bold;
    margin: 20px auto;
  }

  #borderimg1 {
    border: 10px solid transparent;
    border-image: url('border.png') 30 round;
  }

  #borderimg2 {
    border: 10px solid transparent;
    border-image: url('border.png') 30 stretch;
  }

  #borderimg3 {
    border: 10px solid transparent;
    border-image: url('border.png') 50 round;
  }

  #borderimg4 {
    border: 10px solid transparent;
    border-image: url('border.png') 20% round;
  }

  #borderimg5 {
    border: 10px solid transparent;
    border-image: url('border.png') 30% round;
  }
</style>
</head>
<body>

  <div id="borderimg1">Border Image Rounded</div>
  <div id="borderimg2">Border Image Stretched</div>
  <div id="borderimg3">Border Slice 50px</div>
  <div id="borderimg4">Border Slice 20%</div>
  <div id="borderimg5">Border Slice 30%</div>

</body>
</html>